
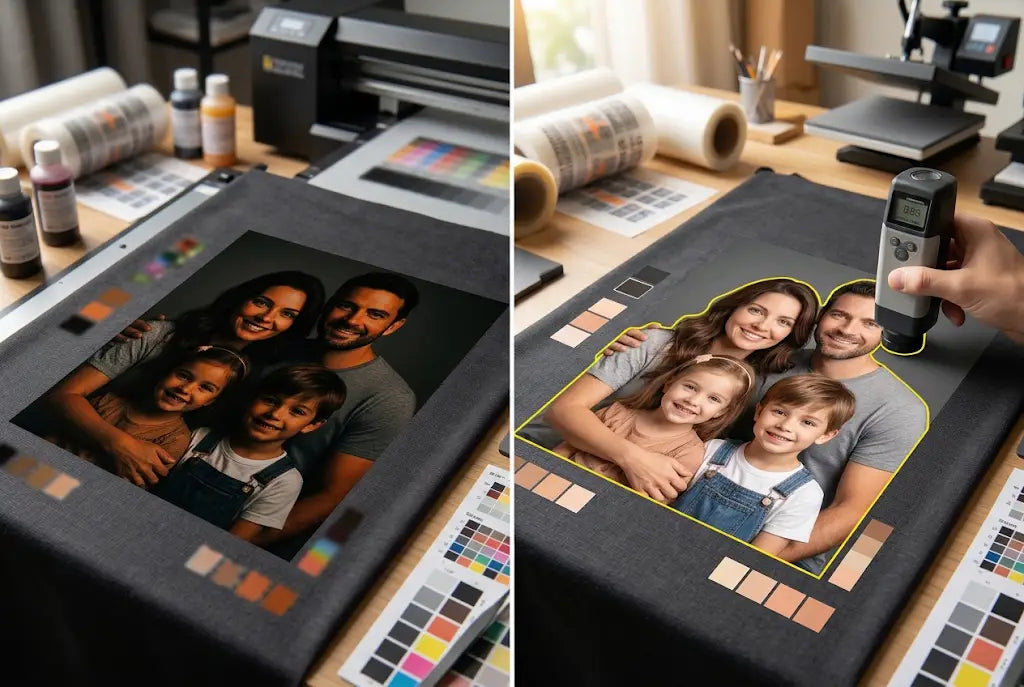
Family photo orders print dark because DTF lays white too heavy and your file is still in phone brightness, not print brightness.
DTF photo transfers look muddy when skin tones get 15% to 20% too much black ink and white underbase chokes detail. Your phone screen is backlit at 500 to 700 nits, so a photo looks bright at home. On film, that same file prints without light behind it.
We've fixed this for reunion shirts, memorial shirts, and holiday family photos for years. The fix is not a filter, it's file prep and white control.
Why Photo DTF Transfers Print Dark on Shirts
Most photo files are made for screens, not ink. Screens add light. Ink absorbs light.
The Three Reasons Family Photos Turn Muddy
- Phone photos are underexposed for print: iPhone and Android auto-expose for faces on screen, not for ink on cotton. A photo that looks perfect at 80% brightness on a phone needs 10 to 15 points lifted in Photoshop to hit the same look on the shirt. If you print straight from camera roll at 72 DPI, shadows block up
- White underbase is too heavy: Default white at 90% to 100% density makes colors pop on black shirts but kills photo depth. White at 100% under skin acts like thick paint, so light doesn't pass through color, it bounces and makes skin look chalky and dark at same time. For photos we use 60% to 70% white under faces
- Black ink fills skin shadows: RIP software adds black to make rich shadows. On logos that's good. On skin that's bad. Skin should be mostly magenta and yellow, with 2% to 8% black max, not 15% to 25%. When black hits 20% in cheeks, faces look dirty
- Resolution matters: A 2MB phone photo cropped tight is often 150 DPI at 10 inches. Under 200 DPI, DTF dots spread and fine skin texture smears, which reads as muddy even if color is correct
- Fabric changes brightness: On white shirts, no white underbase needed, so photos print 10% to 12% lighter. On black shirts with heavy white, same file prints 10% to 12% darker because white reflects less than paper
And that's why two customers send the same photo and one says perfect and one says dark. The shirt color and white setting changed everything.
How to Fix Skin Tones Before You Print Custom Photo DTF Transfers
You don't need to be a retoucher. You need four quick moves that take 3 minutes per photo.
Step 1: Lift Exposure and Shadows in Any Free App
- Raise exposure 0.3 to 0.5 stops: In Lightroom, Photos, or Snapseed, lift exposure plus 10 to 15, shadows plus 25 to 35, and blacks minus 5 to 10. This opens faces without washing out background
- Check histogram: Skin should sit in the middle 60% of histogram, not left 30% where shadows live. If histogram piles left, photo will print dark every time
- Don't use auto enhance: Auto adds contrast and saturation that plugs skin. Manual lift keeps detail
- Save at 300 DPI: Resize to actual print size like 10 inches wide at 300 DPI, sRGB, PNG. Don't send HEIC or 72 DPI screenshots, they print soft and dark
Step 2: Reduce Black in Skin and Add Warmth Back
- In Photoshop selective color: Go to Selective Color, choose Reds and Yellows, set black slider to -15% to -25% for reds, -10% to -20% for yellows. This pulls muddy black out of cheeks and forehead without losing contrast in clothes
- Fix orange skin: If faces go orange after lifting, reduce yellow in reds by 5 to 10 and add magenta 3 to 5 in skin. Real skin is pink-yellow, not orange-yellow. DTF magenta tends to print strong, so you can pull yellow slightly
- Keep eyes bright: Dodge eyes plus 5 to 8 exposure with a small brush so they don't sink. Eyes make photo feel sharp even if skin is soft
Step 3: Control White Underbase for Photos
This is the biggest lever for DTF photo transfers that print too dark.
- Use 60% to 70% white under faces: Ask your printer to choke white under skin or set white at 60% for photo areas. Full 100% white is for vector logos, not faces. At DTF Promo we run 65% white for family photos on black shirts as standard
- Feather white edges: Don't have a hard white edge under the photo cutout. Feather 2 to 3 pixels so white doesn't show as white line if press shifts 0.2mm
- No white on white shirts: On white and ash shirts, print with no white underbase or 15% to 25% light white only. This keeps photo light and soft hand, 40 to 60 microns instead of 90 to 110
Step 4: Test Press One Before You Press 30
- Press one sample: Press one photo at 300 to 305 degrees, firm pressure, 15 seconds, peel, then second press 5 seconds with parchment. Check skin under daylight, not yellow shop light. Shop lights make everything look warm
- Wash test: Wash sample cold inside out once. Photos should lighten 3% to 5% after first wash as loose ink leaves. If it still looks dark after washing, lift exposure 10 more points and reprint film. Film reprint costs $0.75, not a ruined $7 shirt
- Check from 3 feet: Family photos are viewed from 3 to 4 feet, not 6 inches. Step back. If faces read clean from 3 feet, it's good. Don't chase pore detail, DTF can't hold pore detail under 0.1mm anyway
How to Print Photos With DTF So Details Stay Clear
After you fix skin, you need to keep detail so the photo doesn't look like a blurry iron-on.
Settings That Keep Photo DTF Transfers Sharp
- File type: PNG with transparent background if you want cutout around people, or PNG with background if you want full rectangle photo. Don't use JPG at quality 60, it adds artifacts in skin that look like dirt
- Size: Print 9 to 11 inches wide for adult front, 3.5 to 4 inches for youth chest. Under 8 inches, faces under 1 inch tall lose eyes. Over 12 inches, you hit seams and stretch zone that cracks
- Sharpen lightly: Apply unsharp mask 40% to 60%, radius 0.8 to 1.2, threshold 2. This counters DTF dot gain of 8% to 12% where ink spreads slightly during press. Over-sharpen at 150% creates halos around hair
- Avoid pure black backgrounds: Pure black at 100% K plugs and looks like holes. Use 80% black or dark navy at 90% density so you still see hair edge
- Group photos: For 8 plus faces, print 11 to 12 inches wide minimum, 300 DPI. Each face needs at least 0.6 inch tall to keep eyes. Smaller and eyes merge into shadow
- Memorial photos: Lift shadows extra 10 points for older faded prints scanned at low DPI. Scanned prints already lost 20% to 30% shadow detail, so you must open them more
At DTF Promo we see best results when customers send original camera photos, not screenshots from Facebook. Facebook compresses to 72 DPI and adds contrast that blocks skin.
Ready to order?
Upload your artwork and we'll take care of the printing with fast turnaround and dependable quality.
Common Mistakes That Make DTF Transfers for Photos Look Muddy
We've reprinted thousands of family orders and the same errors repeat every week.
Mistakes to Avoid on Photo DTF Transfer Orders
- Sending filtered photos: Instagram filters add heavy contrast and orange tint. Filtered skin prints 15% darker and oranger on DTF. Always send unfiltered original
- Printing too small: A family of 6 printed at 6 inches wide means each face is 0.5 inch. At that size DTF can't hold eye detail, so the photo reads as a dark blob. Go 10 plus inches for groups
- Heavy white everywhere: Running 100% white under the whole photo makes the hand thick at 110 microns and makes colors look pasty. Use 60% to 70% under skin, 75% to 85% under clothes for balance
- Not removing background halo: If you cut out people in Canva with an auto background remover, you often leave 2 to 3 pixel dark halo around hair. That halo prints a dark outline that makes the photo look muddy. Zoom to 200% and erase halo
- Pressing too hot: Pressing at 320 plus for 20 seconds overcooks color and makes yellow fade, leaving skin pink-brown. Stick to 300 to 310, 15 seconds, firm pressure
- Wrong shirt color: Same photo on black with heavy white looks 12% darker than on white with no white. If family wants black shirts, warn them and lift exposure extra 8 to 10 points for black
Pricing and File Checklist for Custom Photo DTF Transfers That Save Reorders
Photo orders have a higher return rate than logos, 8% to 12% versus 2% for logos, because skin is personal. Good checklist cuts returns to 3%.
Checklist Before You Submit Photo DTF Transfer
- Resolution 300 DPI at print size: 10 inches wide at 300 DPI is 3000 pixels wide. If your file is 1200 pixels wide, it's 120 DPI and will print soft and dark. Request original from customer
- Exposure lifted 10 to 15 points: Faces should look slightly bright on screen, almost overexposed, to print correctly on shirts. What looks too bright on phone prints perfect on cotton
- Black under 8% in skin: Check CMYK info, skin should be low black. If you don't have Photoshop, just pull shadows up and blacks down, it does same
- White setting noted: Tell printer 65% white for photos on darks, no white on whites. At DTF Promo we apply this automatically when you select photo transfer option
- One test press: Press one, wash once, check in daylight. Cost of one test is $7 blank plus $1.50 film versus 20 shirts reprinted at $140
- Customer proof: Send the customer a proof that says the photo will print slightly lighter than screen after wash. Set expectation and reduce my photo looks dark complaint by half
Conclusion
Family photos print dark on DTF because your file is made for a bright screen, not for ink on film, and because white underbase is too heavy for skin.
When black creeps over 15% in cheeks and white hits 100% under faces, skin goes muddy and orange-brown, shadows plug, and detail disappears. Lift exposure 0.3 to 0.5 stops, raise shadows 25 to 35, pull blacks down 5 to 10, and take 15% to 25% black out of reds and yellows. Print at 300 DPI at 10 to 11 inches wide for groups, use 60% to 70% white under skin on dark shirts and no white on white shirts, and press at 300 to 310 degrees for 15 seconds with a second 5 second press. One test press and one cold wash tells you if you need 10 more points of lift before you run 30 shirts. That workflow for DTF photo transfers at DTF Promo is how we keep faces bright, not chalky, and keep family reunion orders from turning into reprint piles.
Ready to order DTF Photo transfers that look perfect under any light?
Upload your artwork and we'll take care of the printing with fast turnaround and dependable quality.
Frequently Asked Questions
Why Do DTF Photo Transfers Print Dark on Black Shirts?
DTF photo transfers print dark on black because heavy white at 90% to 100% plus black ink in skin shadows blocks light. Phone photos look bright on screen at 600 nits but print without backlight. Lift exposure 10 to 15 points, pull black in reds minus 15% to 25%, and use 60% to 70% white under faces to keep skin bright.
How to Print Photos With DTF So Skin Looks Natural?
To learn how to print photos with DTF for natural skin, use 300 DPI file at actual size, lift exposure 0.3 to 0.5 stops, shadows plus 25 to 35, selective color black minus 15% in reds. Use 60% to 70% white underbase on darks, no white on white shirts, press 300 to 310 degrees 15 seconds plus second press 5 seconds.
What DPI Should Custom Photo DTF Transfers Be?
Custom photo DTF transfers should be 300 DPI at print size, sRGB PNG. A 10 inch wide print needs 3000 pixels wide. Under 200 DPI, DTF dot gain of 8% to 12% smears skin texture and eyes blur, making photo look muddy. Don't send 72 DPI screenshots or compressed Facebook images, they lack detail and print dark.
How Do I Fix Orange Skin on Photo DTF Transfer?
Orange skin on photo DTF transfer happens when yellow is too high and magenta prints strong. Reduce yellow in reds by 5 to 10, add magenta 3 to 5 in skin for pink balance, and pull black minus 15% in reds. Press at 300 to 310 not 320 plus, high heat fades yellow and leaves orange-brown cast.
Can DTF Transfers for Photos Go on White Shirts?
Yes, DTF transfers for photos look best on white shirts because no heavy white underbase is needed, so photo stays 10% to 12% lighter and the hand is soft at 40 to 60 microns. Print with no white or 15% to 25% light white only. On black shirts the same file needs 8 to 10 points extra exposure lift to match.
Where Can I Order DTF Photo Transfers at DTF Promo With Skin Fix?
You can order DTF photo transfers at DTF Promo with a photo setting that uses 65% white under skin on darks, 300 DPI check, and background halo removal. Upload original unfiltered photo, not screenshot, at print size like 10 inches wide. We press sample guidance and fast turnaround to save family photo orders from reprints.
Why Do Group Photos Look Muddy on DTF Photo Printing?
Group photos look muddy on DTF photo printing when printed too small or with blocked shadows. Each face needs 0.6 inch minimum height to hold eyes. For 8 plus people print 11 to 12 inches wide at 300 DPI. Lift shadows plus 25 to 35 so back row faces open, and avoid pure black background at 100% K.
Do Photo DTF Transfers Last After Washing?
Yes, photo DTF transfers last 50 plus washes when pressed at 300 to 305 degrees firm pressure, peeled, then second press 5 seconds with parchment. Wash cold inside out, tumble low. Lighten 3% to 5% after first wash is normal. Heavy white at 100% cracks sooner, so use 60% to 70% under skin for softer 80 micron hand.
How Much Do DTF Transfers for Photos Cost Per Shirt?
DTF transfers for photos cost $0.75 to $1.50 per 10 inch photo when ganged at $3.00 to $4.50 per sq ft, plus blank $5.00 to $6.50, total $6.50 to $8.50 per shirt. Film reprint for exposure fix costs $0.75, not whole shirt. At DTF Promo bulk gang sheets cut cost per photo 20% to 30%.
What File Type Is Best for Custom Photo DTF Transfers at DTF Promo?
Best file for custom photo DTF transfers at DTF Promo is original camera PNG at 300 DPI, sRGB, actual print size, unfiltered, no dark halo around hair. Avoid HEIC, low quality JPG at 60, and Facebook screenshots at 72 DPI. Send 10 to 11 inch wide for the family front, 3.5 to 4 inch for the youth chest for clear eyes.